Custom Pay Framework
Quiq offers a way to send payment requests to end users across all the payment channels supported by the Quiq platform. The following document describes how to integrate the payment processor a Client is currently leveraging into Quiq to give Users the best and most secure payment experience.
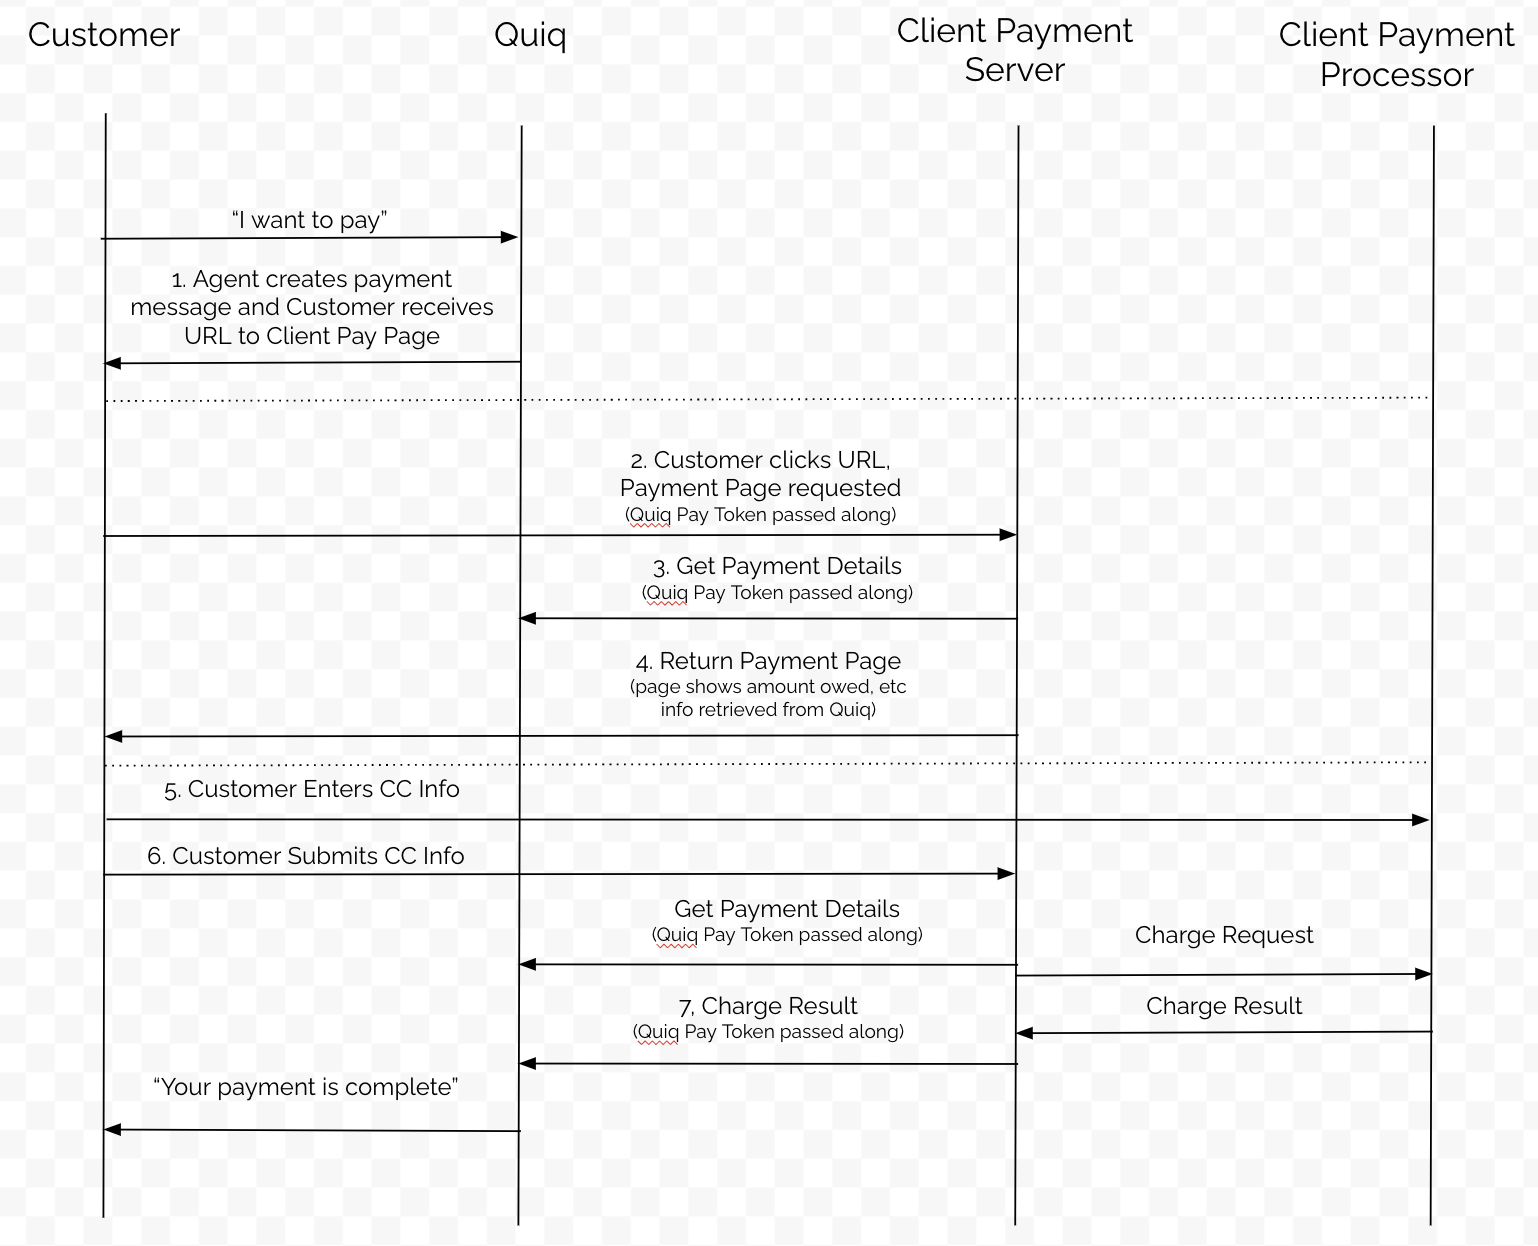
The following flow describes the payment process between an end User, Quiq, and a Client, and is discussed in greater detail in the following sections.
Configuration
To integrate into Quiq’s payment messages, a Client needs to provide Quiq with the following information:
- Payment Collection URL - This is an endpoint hosted by the Client that will allow the User to submit their credit card information and/or perform a checkout operation to complete their purchase. This url must be secured with HTTPS and will take the following query parameters:
- token - this is the payment token jwt, which can be passed into an API provided by Quiq to retrieve the payment message. This same token is used when posting a response to the payment message back into Quiq (see below).
- key (optional) - when the Client creates a payment message, they have the option of including a key that Quiq will mirror back to the Client as a query parameter in the Payment Collection URL. This adds an additional layer of security on the url and can be used along with the token to ensure the context of the transaction.
- Payment Key - This is a key generated by the Client that Quiq will store on our back end servers, and be used to validate any payment responses submitted by the Client. The purpose of this key is to further secure payment responses so that someone with admin access to Quiq cannot generate basic auth keys and submit false payment responses to make it appear that products were purchased when they were not.
Step 1 - User and Agent Payment Handshake
Payments in Quiq start by the User and the Agent (either a human or bot) agreeing that a payment will take place. When this happens, the Agent generates a payment message in Quiq. This message will include payment details such as a description, amount, line items, and any additional metadata necessary for processing the payment. When the payment message is created, Quiq then creates a payment url by taking a Payment Collection URL (https://client.com/payment-page, etc.) supplied by the client and registered with Quiq. Quiq then applies a payment token (a JWT generated by Quiq that gives context to the payment in question) and optional key to the URL as query parameters to generate a URL like the following:
https://client.com/payment-page?token=tokenstringhere&key=optionalKeyhere
After this URL is generated and shortened it is sent to the User so they can complete the payment.
Step 2 - User Clicks Payment Link
When the User clicks the payment link, they are taken to the Payment Collection URL specified by the Client, which is hosted by the Client outside of Quiq. This page will load outside of the messaging channel in the User’s web browser of choice. The loading of this page is described in Steps 3 and 4.
Step 3 - Client Retrieves Payment Data from Quiq
When a User visits the Payment Collection URL specified by the client, a few things need to happen on the Client’s back end server. First, the back end server needs to take the payment token (specified in the token query parameter) and pass it into the following public Quiq API (along with basic auth credentials) to retrieve details about the payment.
https://developers.quiq.com/api/docs#operation/Gets%20the%20custom%20interaction%20message
This includes things that they may want to show to the User (such as description and amount), and also if the payment has already been completed or not. When checking to see if a payment has a result already or not, the response section of the payload should be consulted.
NOTE: While Quiq keeps payment sessions up to date on our end in terms of whether the session is still active, or if the payment has been completed or not, the Client should not solely rely on Quiq to ensure replay attacks or other ways duplicate payments could occur are prevented. This responsibility ultimately rests within the Payment Collection URL and the Payment Processor used by the Client.
Step 4 - Client Returns Payment Page to User
Once the Client’s back end has knowledge of the payment in question, it should return a page that the User can interact with to enter their credit card information and submit the payment.
Step 5 - User Fills Out Credit Card Information
Once the User has loaded the Payment Collection URL in their browser, they can begin filling out Credit Card information (or perhaps using an already on file Credit Card or shopping cart system if this page makes them authenticate first, etc.). The main thing to call out with this step, is that normally if the User is entering credit card information, that data is being entered into fields hosted by the Payment Processor and not the Client, which limits the Client’s PCI exposure.
Step 6 - User Submits Credit Card Information, Client Submits Payment
When the User submits their credit card information and completes the payment, it is up to the Client’s back end server to submit the payment to the Payment Processor.
Normally this is a synchronous call from the Client to the Payment Processor, which results in a payment result (success/fail). The back end server might need to use the payment token to once again fetch any payment details (amount, description, metadata, etc.) that they wish to submit to the Payment Processor.
Step 7 - Client Reports Payment Result
At this point the payment is complete and money will change hands and the Client just needs to notify Quiq of the result of the payment. This allows Quiq to invalidate the payment session on the payment message, and also allows Quiq the opportunity to let the User and the Agent know the result. To make this call, the Client must provide the payment token, as well as basic auth credentials and the payment key mentioned in the configuration section above. Again, the extra key is a security measure around the sensitive nature of saying that a payment has been completed. The following public API call used for this purpose:
https://developers.quiq.com/api/docs#operation/Replies%20to%20the%20custom%20interaction%20message
Also, it is worth mentioning that when completing a payment, the Client has the flexibility to change the amount and line items on the payment by using the appropriate overrides on the response. This is useful if the User elected to do a partial payment, or if the Payment Collection URL calculates sales tax or shipping charges.