Quiq Bot Designer Guide
Table of Contents
- Overview
- Creating a Bot User
- Versioning
- Exporting and Importing Definitions
- Determine Intent
- Gather Data
- Send a Message
- Execute Logic
- Route
- Close
- Call Webhook
- Special Events
- Additional Actions and Side Effects
- Download Bot Statistics
- Bot Designer vs. Conversation Rules
- Training Videos
- Templates and Examples
Overview
With Quiq’s bot designer you can build powerful bots that automate all or parts of your conversations without writing any code. You can use the bot designer to build bots that:
- Gather essential data about the customer inquiry before escalating to live agents
- Determine the nature of the customer inquiry and route to the appropriate group of live agents (or another bot)
- Answer frequent customer inquiries
- Guide the customer through troubleshooting flows
- Help agents perform repetitive tasks that occur during conversations
- Any combination of the above, and much more
The bot designer is part of Quiq’s bot framework which also includes the Bot API. No matter how you build your bot, you’ll enjoy the following benefits of bots in Quiq:
- The bots you design will work across all of Quiq’s supported messaging platforms
- You’ll have access to Quiq’s comprehensive rich messaging capabilities including menus, cards, auth, pay and more
- Bots are just like agents in Quiq. You can monitor them in the Reports app, take over conversations and make them a part of any workflow that may include live agents. Any data collected by your bots will be visible to live agents and vice versa.
Creating a Bot User
The first step in designing a bot within Quiq’s bot designer is to create a new bot user. Bots are a special type of agent within Quiq. The ability to create and edit Bot Users is available to administrators from within the Admin portion of the Quiq app. Select the Bots tab from the left-hand side and click the ‘Create New Bot’ button at the top. Give the bot a name, email etc. Then click save.

After creating the bot user you must choose which type of bot you’re building. To use the bot designer simply select ‘Quiq Bot’ from the Bot Type dropdown menu.

Upon choosing Quiq Bot and clicking save, you will be granted access to open the Quiq Bot designer.
Versioning
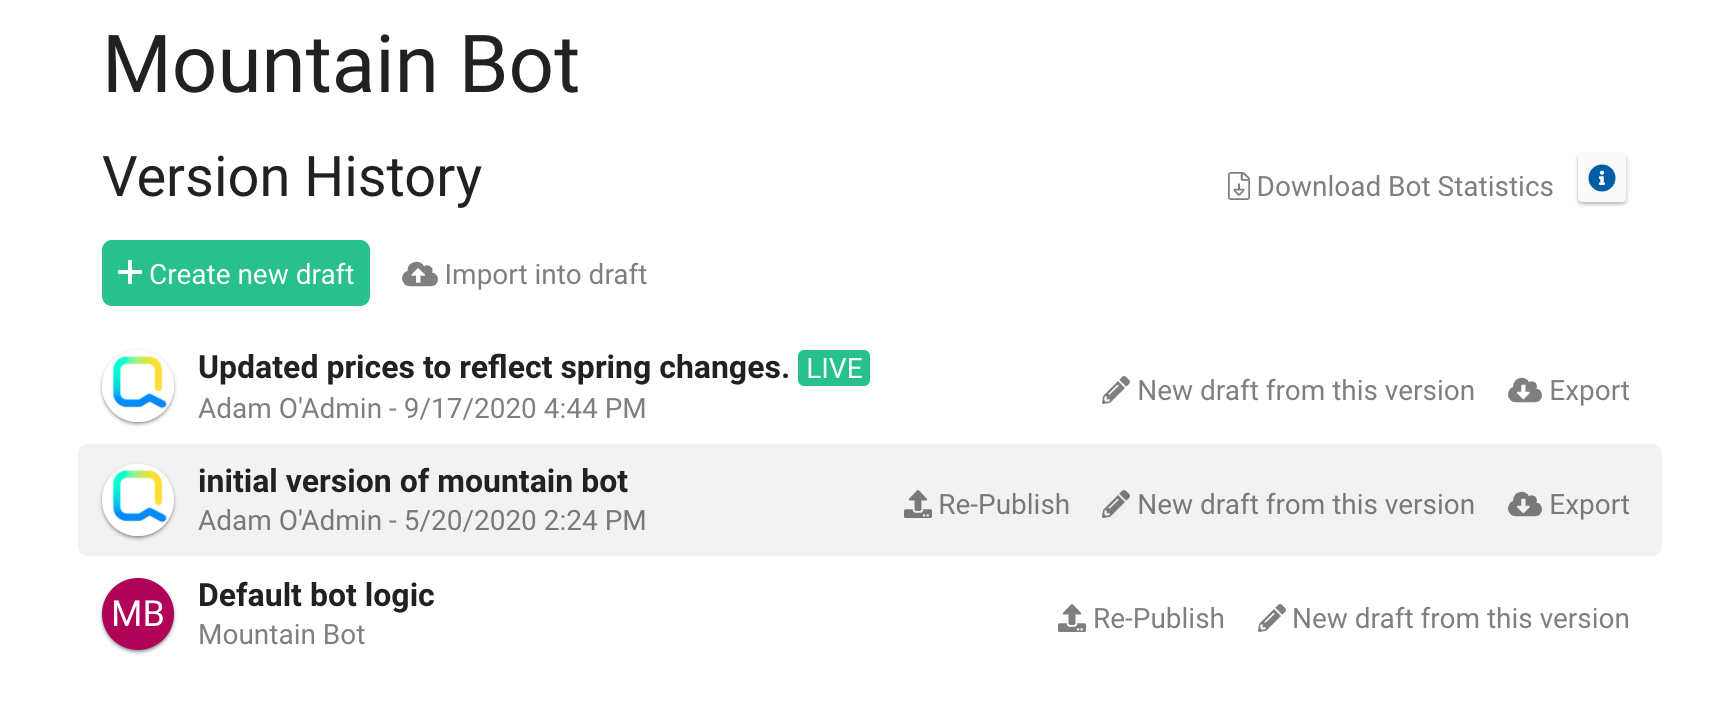
Before diving into how to build a bot in the designer, let’s talk about how they are versioned. Each bot you design has its own revision history that is similar to the revision history used by Conversation Rules.

The revision history allows you to track changes over time and easily revert back to previous versions of the bot’s behavior. To create a new revision, you must first create a draft version of the bot and edit its behavior in the designer. Once you’re comfortable with your changes, you may Save and then Publish your draft into a new revision. You will be prompted for a description of your changes.
 Publishing a new revision from within the designer
You can create a draft using any previous revision as the starting point. If you click the big green Create new draft button then the draft will start from the revision that is currently live, in this case “correct minor spelling issue. Support case 2831”.
You may be wondering what happens to ongoing conversations when you either publish a new revision or revert to a previous revision. When a conversation is assigned to your bot, it will be associated with whichever revision is currently live and will stay with that revision of the bot’s behavior until the bot reassigns or closes the convo. Therefore, all conversations that start after you publish a new revision will be associated with that revision, whereas ongoing conversations will remain pinned to the revision they started on. This insures that your bot never has downtime.
One final note on bot versioning: each bot has its own revision history. This is important to bear in mind when deciding whether to put all of your functionality into one bot or to split the functionality across bots that cooperate. The best practice is to introduce additional bots for parts that you would want to update or rollback independently. Another rule of thumb is to introduce separate bots whenever the task at hand represents different job functions within your organization.
Exporting and Importing Bots
You can export any version of a Quiq Bot. The downloaded Bot definition file can then be imported, either to another Bot User, essentially copying the Bot, or into another tenant to migrate changes made in a staging tenant to production.
Export
After opening the Quiq Bot Designer for any Bot User, an Export button is displayed for each version on the Version History page, except for the entry for the original default logic. Both the current Draft and Live versions, as well as previously published versions, can be exported.
Selecting the Export button will download a .json file locally containing the bot definition. The file name is in the format QUIQBOT_botuser_YYYYMMDDHHMISS.json, where botuser is the Bot’s username and the date/time is the time the file was downloaded.
Do not edit this file. If this file is edited in any way, you will not be able to import it.
Import
A previously exported Quiq Bot definition can then be imported into a Quiq Bot to the Draft version. If a Draft version already exists, an Import button is available which will overwrite the existing draft with the definition in the export file. If no Draft version currently exists, then a Import Into Draft button exists which will create a new draft version with the definition from the export file.
After selecting the Import button, you will be prompted for the bot definition file to import. You can drag a file into the box, or click and select one from the file manager.
If you select a file that is not a Quiq Bot export .json file, or the file has been edited in some way, a message will tell you that the file is not a valid Quiq Bot definition and you must select a different file.
If importing into a different tenant than that the Bot was exported from, if the custom fields referenced in the export bot definition are not exactly the same between the tenants, you may also get a message stating that the references to the custom fields need to be removed, and the Bot exported again before it can be imported.
After selecting a valid bot export .json file, depending on the behaviors that are configured in the exported bot definition, you may need to reset some dependencies. Dependencies are references to objects (things like Contact Points, Queues, Agents, etc). Some dependencies may exist in the exporting tenant, but not the importing tenant.
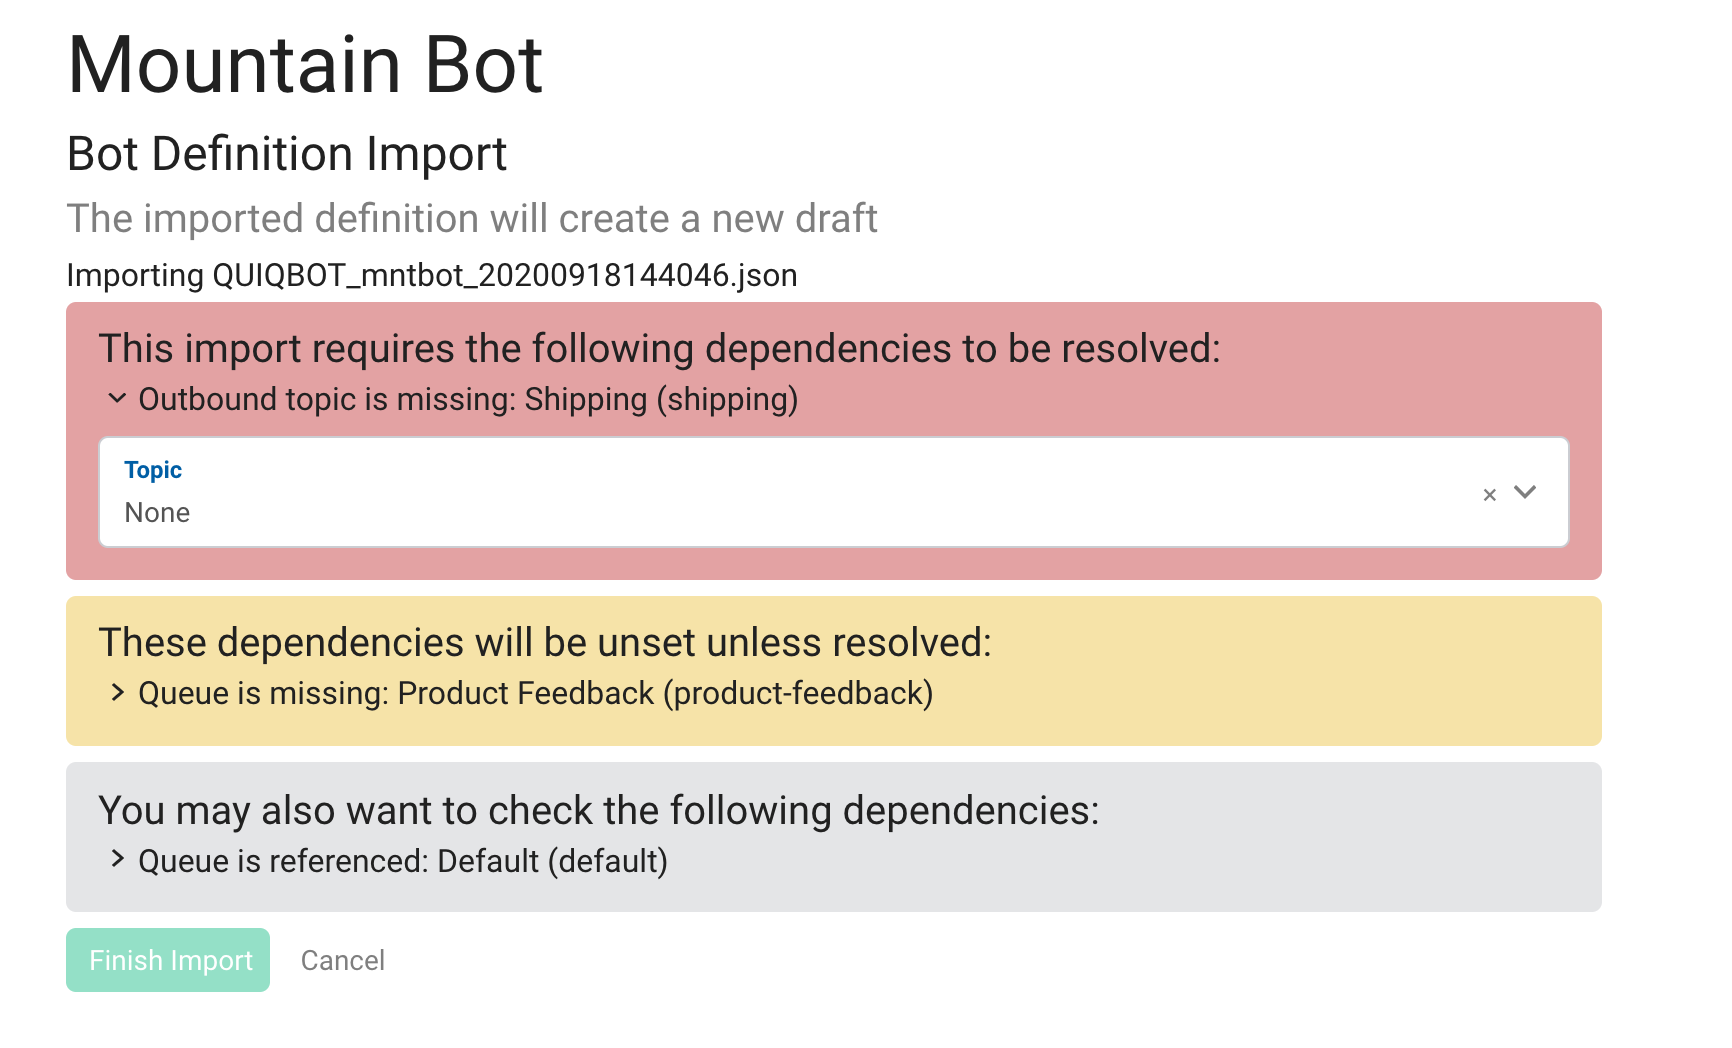
There are 3 types of dependencies: Required (red), Warning (yellow) and Optional (gray).
- The required dependencies must be set to continue. You will be required to map a dependency when you have a Decision Condition that references an object that doesn’t exist on the importing tenant.
- The warning dependencies may be reset, but you are able to continue without setting them. If you do not set warning dependencies, after import you will have validation errors on the Bot that need to be manually corrected.
- The optional dependencies are indicating that the object referenced in some behavior does exist on the importing tenant, but you can change the reference to something else if desired.
After selecting the Finish Import button, you are taken to the Quiq Bot Designer and the draft version of the Bot contains the definition from the export file.
Things to note:
- Exported assets are only available for 5 days after export. When Bot export file containing assets is imported into a different tenant (that does not contain those assets) after the 5-day expiration window, the import will succeed but the assets will be missing. A pop-up notification in the Bot Designer will alert the Admin if this occurs.
- If the exported Bot definition file has behaviors that contain Decision Conditions on a custom field, and that custom field is missing or incompatible on the importing tenant, the Bot cannot be imported.
- If the exported Bot definition file has behaviors that contain Set Field or Increment Field Actions on a custom field, and that custom field is missing or incompatible on the importing tenant, the Bot can be imported. However there will be validation errors that will need to be manually corrected.
Designer Basics
Now let’s dive into the designer itself. Your bot will be built by adding various “behaviors” and hooking them up in meaningful ways. The behaviors and the paths between them are what define your bot. The designer makes it easy to understand your bot by showing a picture of how everything relates in the ‘Flow Pane’:
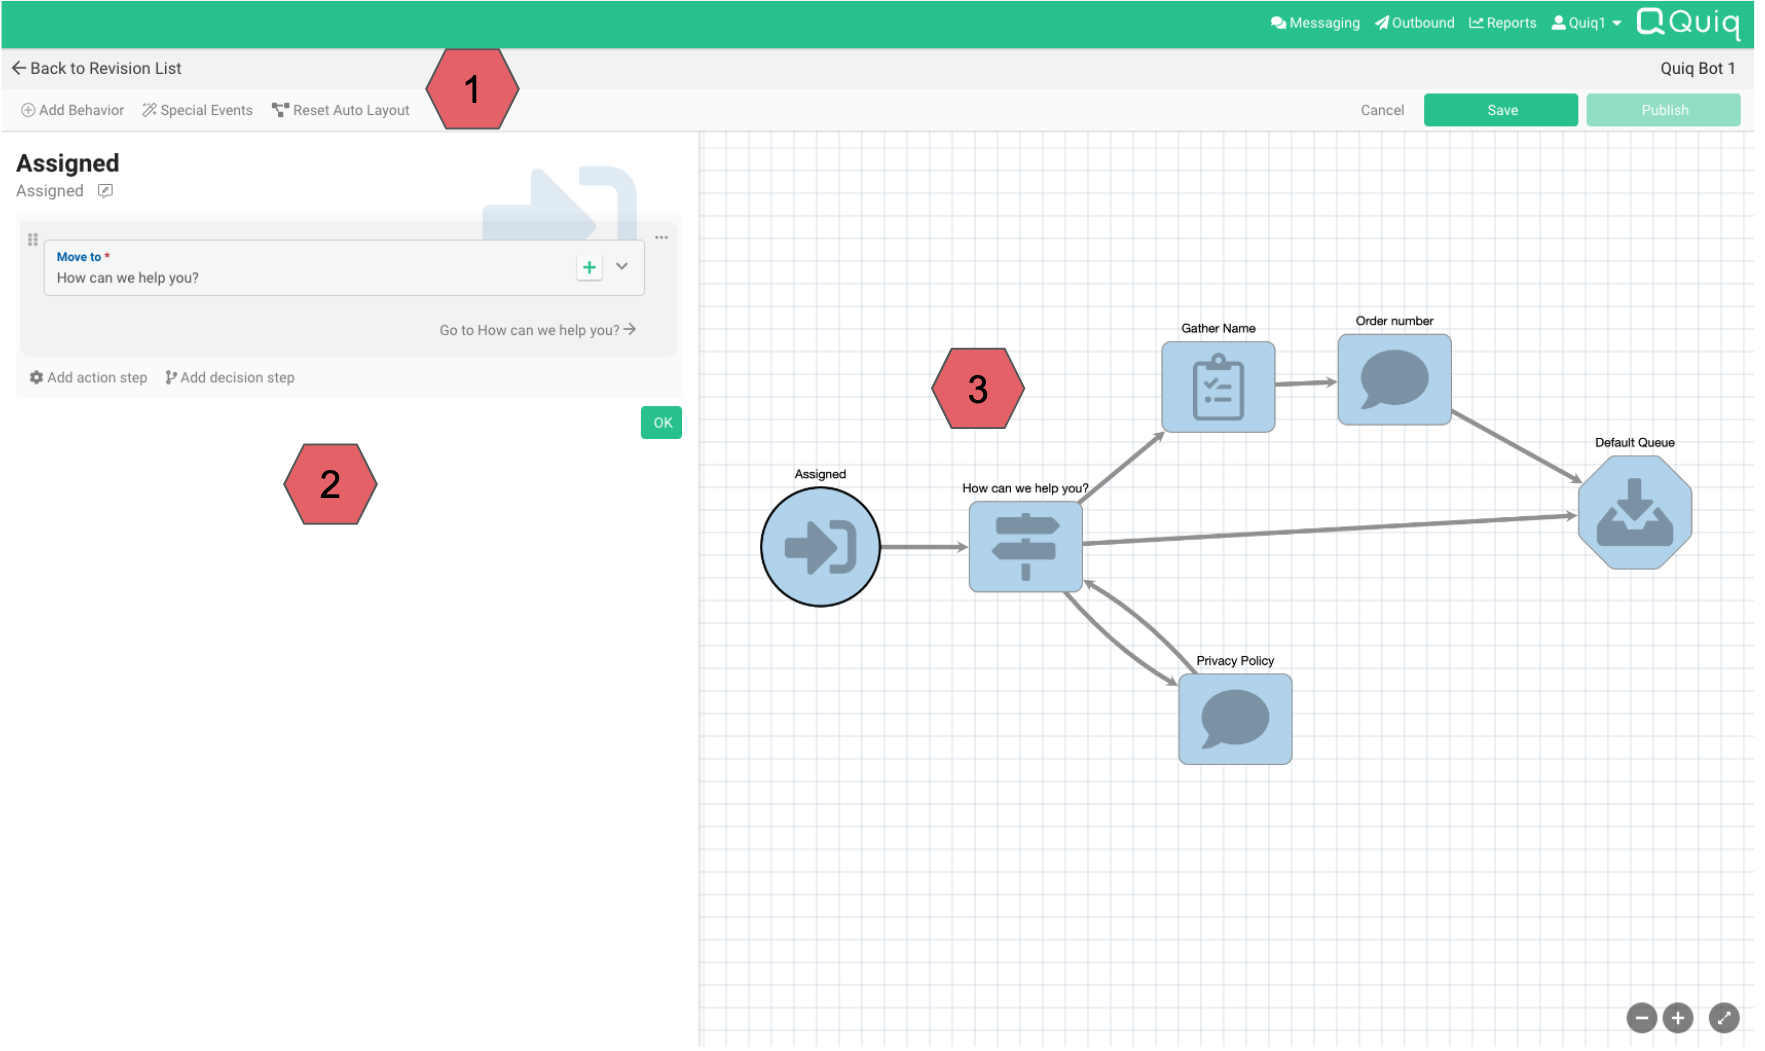 The primary areas of the Bot Designer
- Bot Toolbar - Use the toolbar to add new behaviors, configure special events, reset the flow layout and Save/Publish your changes
- Configuration Pane - Used to configure individual behaviors or special events. This area is collapsed until you begin configuring something
- Flow Pane - The focal point of the bot designer - a picture of how your bot works from which you can select pieces to work on
The flow pane is the focal point of the bot designer. It shows how the bot behaviors relate to one another as well as the overall conversation flow. The designer attempts to layout your bot in a visually pleasing way, but you may wish to manually rearrange the behaviors. You can drag-and-drop all elements that appear in the flow pane. Should you wish to return to the automatic layout, click the Reset Auto Layout button in the toolbar. If you wish to move multiple items at once, simply press and hold the command/control button and use the mouse to select multiple items.
To configure a given behavior or special event that appears in the flow pane, simply double-click it and the configuration pane for that item will appear on the left. A behavior can be created by copying an existing behavior. Select the behavior you wish to copy in the flow pane, and use the Copy/Paste options from the right-click context menu, or the Cntr/Cmd-C and Cntr/Cmd-V options to copy and then paste the new behavior onto the Flow Pane.
Note the zoom controls in the bottom right of the flow pane. The ability to zoom in and out will become important as your bot grows more complex. You can also pan the flow pane by clicking in any open space and dragging your mouse.
Bot Behaviors
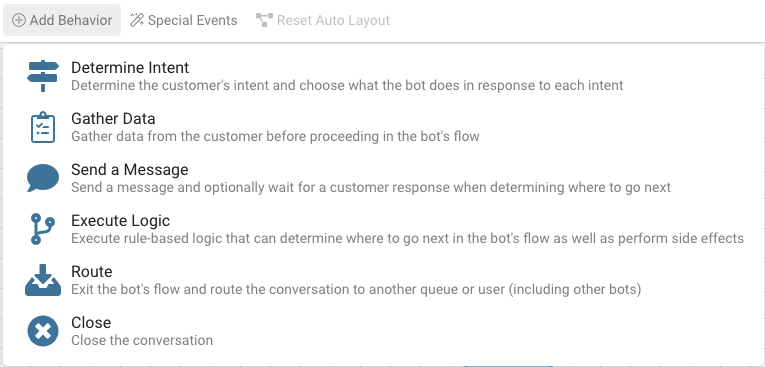 Adding a new behavior from the Designer Toolbar
Behaviors are the backbone of bots built with Quiq’s bot designer. You can add new behaviors by clicking the Add Behavior button on the designer toolbar, or you can add them inline whenever you’re changing locations. Each behavior has a name that is displayed in the flow pane. The following sections provide detailed information about each type of behavior.
Assigned
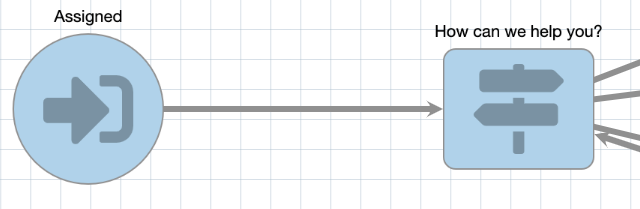 The special Assigned behavior in the flow pane
To kick-off our taxonomy of bot behaviors, let’s talk about a special one that is arguably not a behavior: Assigned. The Assigned behavior is always present in the flow pane and cannot be added from the Add Behavior button. This is the magic location from which your bot starts handling conversations. Your bot will automatically accept and handle any conversation that is either directly transferred to it by another user or routed to it according to queue and role configurations in Quiq’s Admin application. Queueing and routing behaviors apply to bot users in the exact same way that they apply to human agents.
The assigned behavior is required to move to another behavior location. In the simplest case you just choose the next location to go to.
 You can create new behaviors inline when choosing a behavior location to move to
In more advanced cases, you might decide to go to different locations based on information such as data gathered from a chat welcome form, staffing information, queue depths or the current time of day. To make a decision, click Add decision step. For more information, see Making Decisions.
Determine Intent
The determine intent behavior is a high-level behavior that makes it easy for you to figure out what the customers’ current motive is and move to other behaviors appropriately. It is represented with street signs because each intent is required to go somewhere. An intent behavior is a good first location for any bot that directly receives conversations from customers.

Configuring an intent behavior consists of three parts:
- Configuring how to ask/solicit the customer for their intent
- Defining the possible intents that can be matched and their corresponding behaviors
- Configuring how the bot should behave if it cannot determine the intent
Prompting the Customer for their Intent
When an intent behavior is entered the bot will attempt to determine the customer’s intent from the most recent customer message*. If an intent is matched then the bot will change behavior locations without sending a message. However, if the bot is unable to determine the intent from a prior message it will prompt the user for their intent. In the screenshot above we’ve configured the message “How can I help you today?” to be sent in this case.
The screenshot also shows how to configure a different message to be used if the bot returns to the intent behavior later in the conversation flow. This helps the bot seem less robotic in cases where it may reuse the intent behavior.
Finally, a checkbox for “Always ask the user for their intent” is provided in case you’d like the bot to always ask the user for their intent, even if it can be determined from the customer’s most recent message. This may help with ambiguity issues.
* The most recent customer message that hasn’t already been used to determine the customer’s intent across all intent behaviors
Defining Intents
The intent behavior in the previous section defines four intents: Order Status, Cancel Order, Product Info and Privacy Policy. Let’s take a closer look at the definition of the Order Status intent.
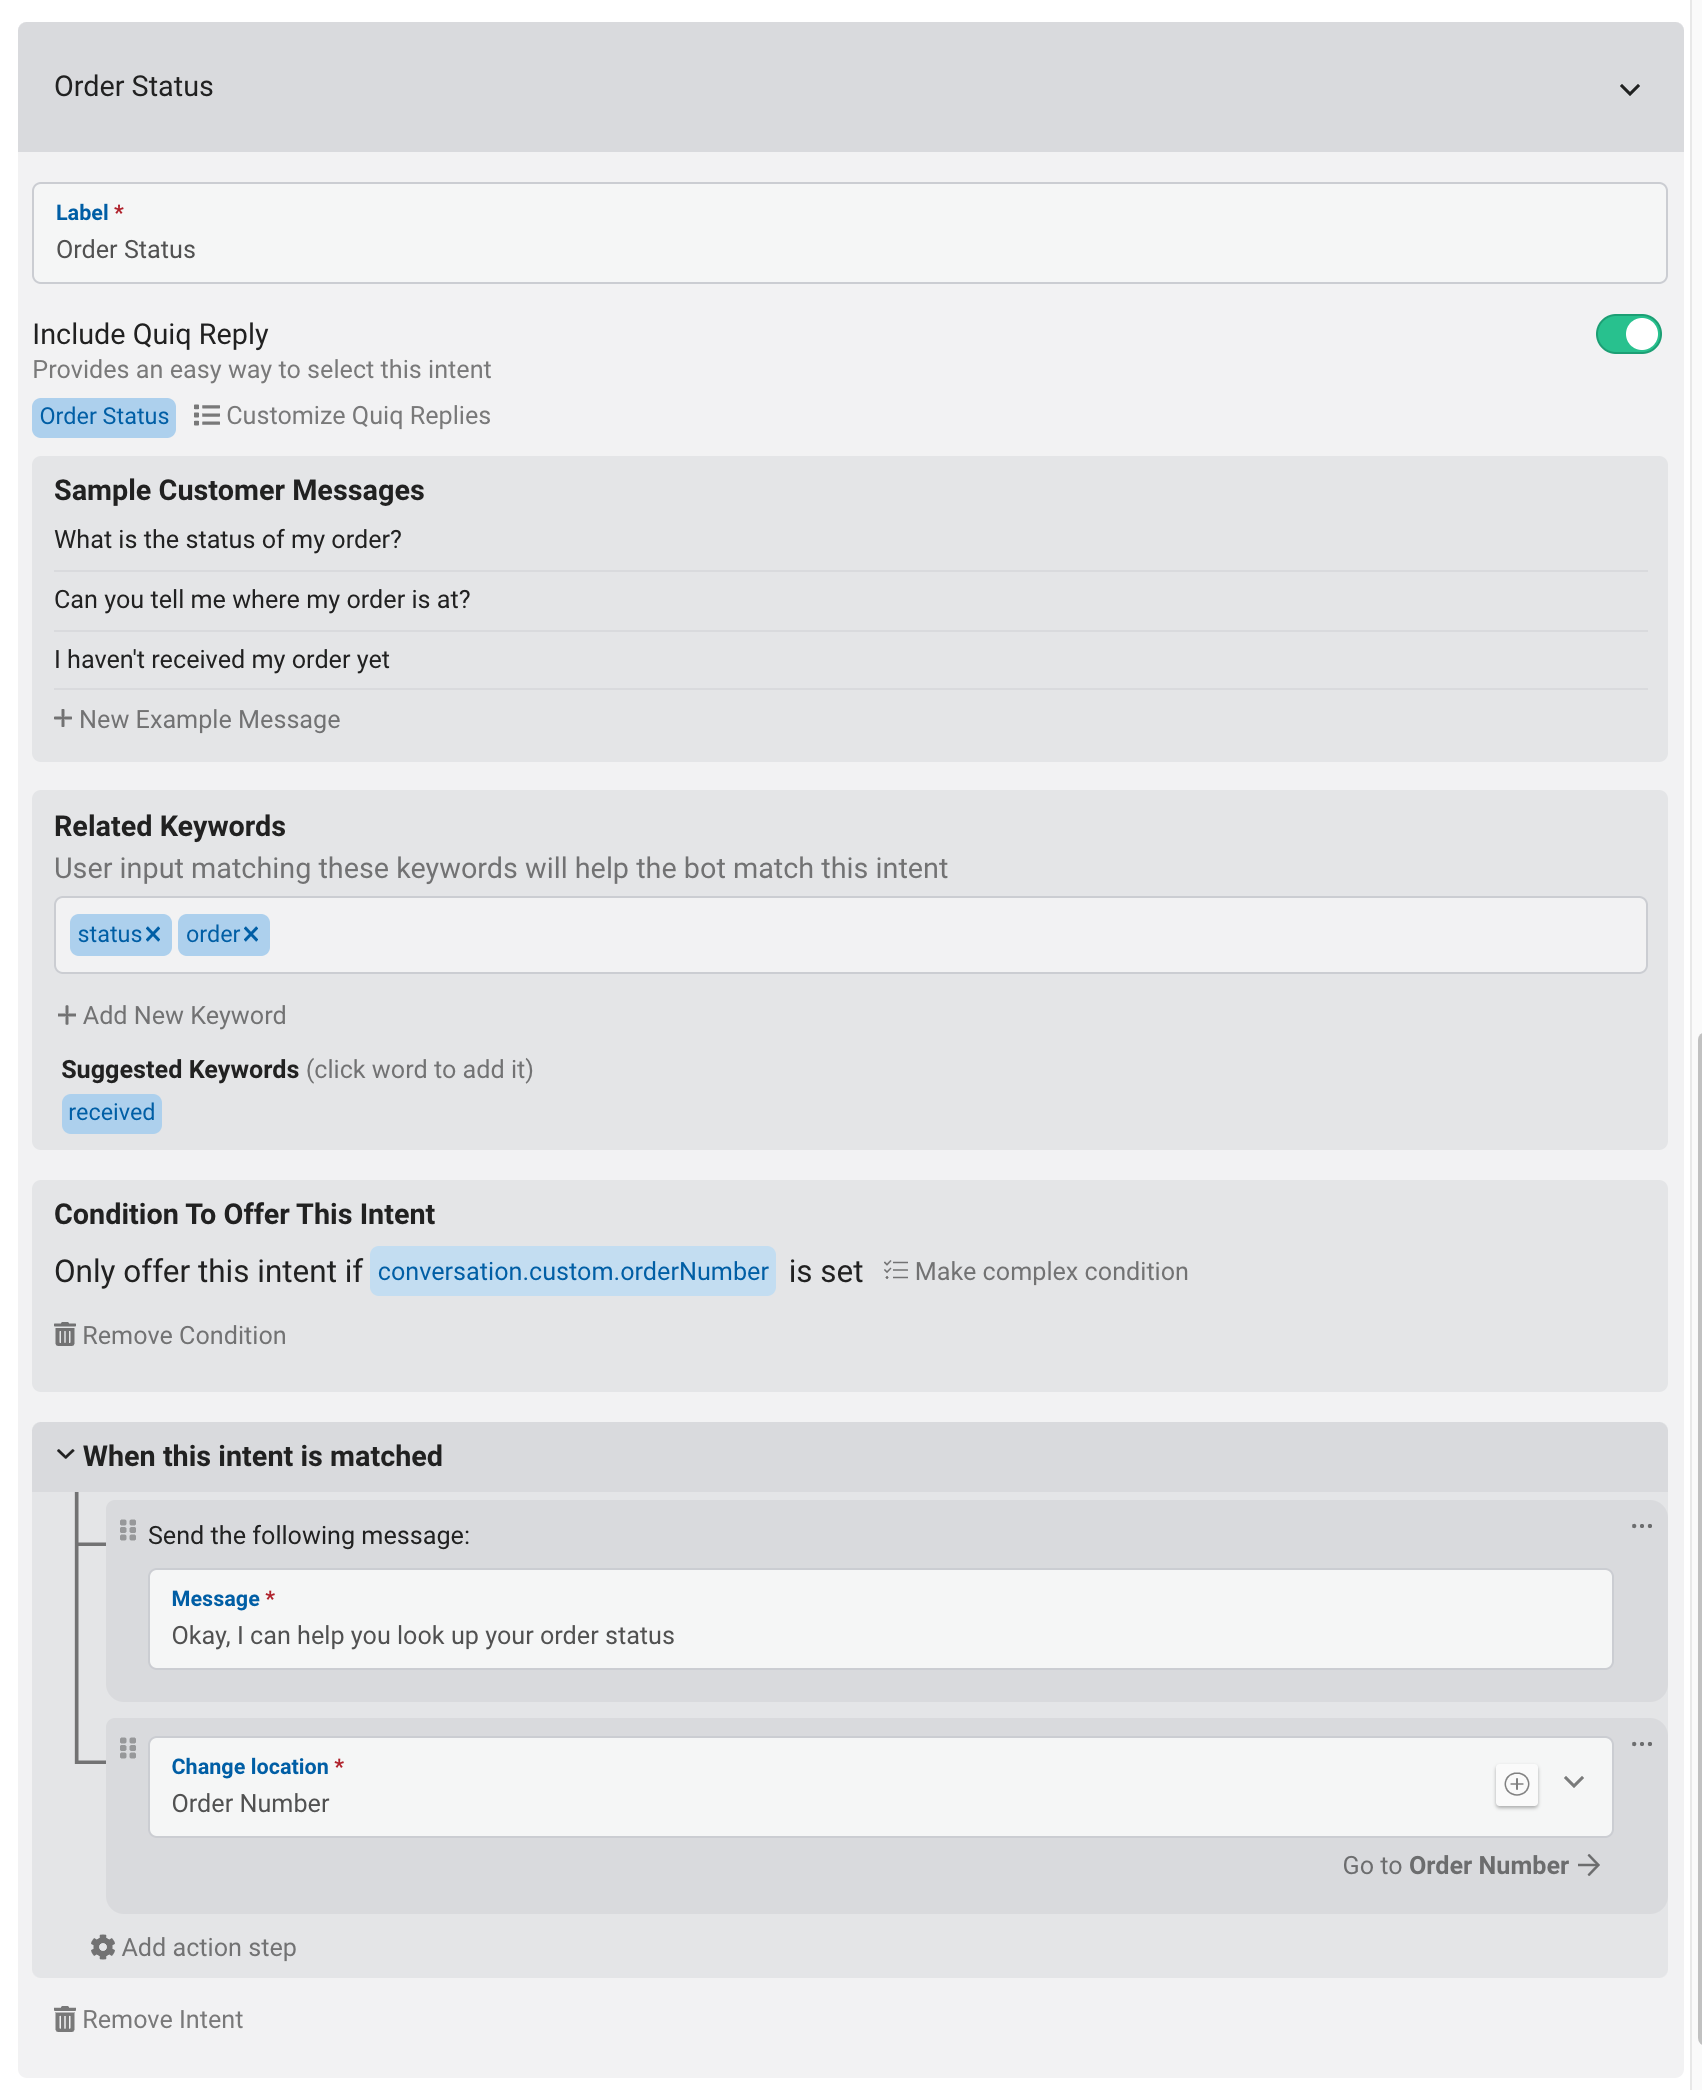
Defining an intent therefore consists of the following steps:
- Giving it a name
- Choosing whether or not to offer the intent as a Quiq Reply on the prompt messages
- Providing example customer messages that should be matched to this intent
- Identifying specific keywords for the intent
- Setting conditions to determine when the intent should be available
- Choosing a behavior to go to when the intent is matched (and possibly other side effects)
Configuring a Quiq Reply, defining example messages and defining keywords are all optional activities. The designer will tell you if you need to provide more information in order to successfully disambiguate intents. Note that if you don’t configure a Quiq Reply for a given intent, that intent is effectively hidden and will never be presented to the user. This might be useful for an intent such as “Deals and Discounts” that you don’t want to specifically offer but you do want the bot to handle in the event that the user inquires about them.
Intent keywords provide a way for you to configure certain words that, when present in a customer message, will automatically match this intent, even if Quiq’s natural language processing wouldn’t otherwise match the intent. When you add an English key word such as “kick”, various other forms such as “kicks”, “kicked” and “kicking” will be matched automatically. This behavior only works on English keywords that consist of a single word.
Setting conditons on an intent is also optional. If no conditions are configured, the intent will always be available. Conditions could be used to only show an intent a set of criteria is true, like if agents are available, it’s currently during work hours, or the customer has returned to the intent behavior a second time.
When the Bot Can’t Determine the Intent
The final step in defining an intent behavior is to specify what should happen if the bot is unable to determine the intent even after explicitly prompting the user. When this occurs, you have two choices: you may either send a message such as “I’m sorry, I didn’t get that.” and stay in the intent behavior, or your may change locations to somewhere else in the bot’s flow such as a Route behavior that escalates the conversation to a human agent.
If you elect to send a conciliatory message, that message will include any Quiq Replies that are defined across the intents to hopefully solicit an unambiguous response from the customer.
As previously mentioned, Determine Intent behaviors are very useful for figuring out what to do with a new conversation that has been assigned to the bot. But, they’re also useful when combined together into a “tree” of nested intent determinations. Such a tree can be used to create troubleshooting guides or IVR style data collection.
Gather Data
The gather data behavior is a high-level abstraction that makes it easy for you to design portions of your bot where you simply want to collect a variety of data from the customer, similar to filling out a form but performed conversationally.
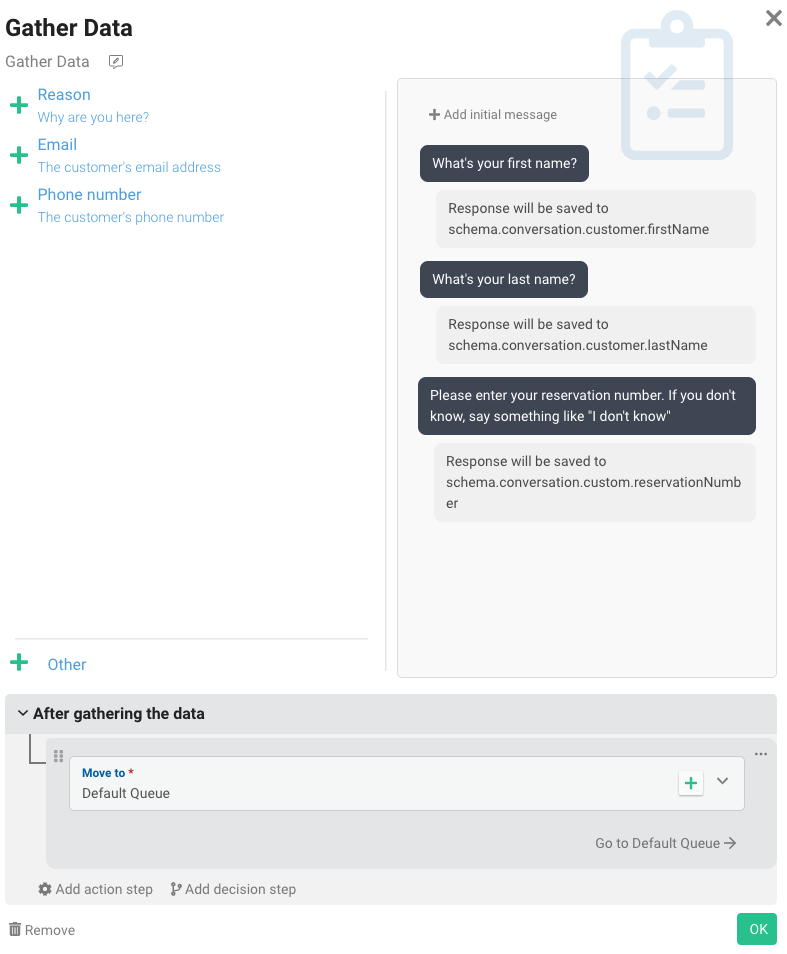
Simply add available data fields on the left to the conversation preview on the right and use the gear icon to configure the messages. You can optionally include an initial message such as “Please answer the following questions so we can better serve you today” using the button at the top of the conversation preview. You can also use the + Other button in the bottom left to add unbound data fields to the form. These questions will be asked every time the conversation flows through the behavior.
Data fields that have dropdown/enum values will be automatically translated into Quiq Reply messages and other data types will be validated appropriately. If the bot is unable to find a valid value for the field, the customer will be re-prompted up to two times before proceeding on to the next data field.
A data field can be configured to allow a customer to skip the field and move on to the next by setting the Allow option to skip checkbox. If the data field is a select-type field, a Quiq Reply option with the skip keyword will be added to the listed Quiq Replies. For other types of fields, the administrator should add text to the Question field instructing the customer what word(s) to type in order to skip the question.
The bot will never prompt the user for bound data it already has. Therefore you don’t need to worry if the data gathering behavior is configured to collect first name, but your company uses Facebook Messenger in which case the first name is automatically available. In that case, the bot will automatically pass over that field. It is therefore possible to enter a Gather Data behavior and immediately leave if all of the configured data was already known..
Also note that when choosing a location to move to in the ‘After gathering the data’ section, you can add a decision step to choose different locations based on the data that was collected. You can also move such logic into a dedicated Execute Logic behavior in the event you want to reuse it elsewhere in the bot’s flow.
Send a Message
The Send a Message behavior allows your bot to send a message and optionally wait for a response from the customer before proceeding. The Send a Message behavior can be somewhat confusing because there are other ways to send messages in the bot designer. Some higher-level behaviors like Determine Intent and Gather Data send messages, and most places where you can change locations or add other side effects in the designer also allow you to add a ‘Send a message’ action step. So why would you use the Send a Message behavior? Here are a few reasons:
- It gives your messages an explicit presence in the Flow Pane
- It allows your messages to be reused from multiple other locations
- It can encapsulate the sending of multiple outbound messages
- It allows you to wait for a customer response and make decisions about it
Because you can wait for and study customer response messages within a Send a Message behavior, they can provide lower-level (i.e. more raw) programmatic abilities than the purposefully high-level Determine Intent and Gather Data behaviors.
Send a Message has both simple and advanced mode. In simple mode, you configure a single message to be sent and a location to move to, and optionally to decide whether to wait for a customer message before moving. In advanced mode, you can author decisions about what message to send (or whether to even send one), as well as decisions about which location to move to.
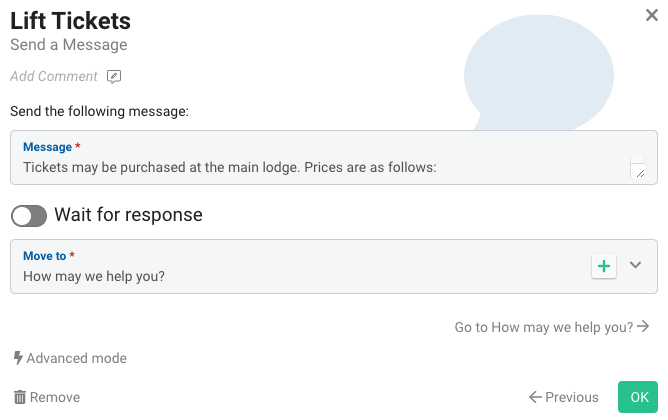 A Send a Message behavior in simple mode, intended to deflect conversations
Execute Logic
The execute logic behavior essentially gives you access to Quiq’s rule engine at any point that you need it in your bot’s conversation flow. All branches of the logic are expected to change locations, so a conversation never stops or rests at an Execute Logic behavior but instead flows through it.
In addition to being required to change locations, Execute Logic behaviors can fire side effects such as sending messages or setting data fields. Here are some example use cases for Execute Logic:
Consider current staffing, queue depths or business hours when deciding whether to route the conversation, close it, or attempting to fully deflect it within the bot
- Consider customer data fields when deciding where to go next in the bot’s flow, e.g. if the customer is a Gold Medallion customer go straight to a live agent, otherwise send them to more bot flow
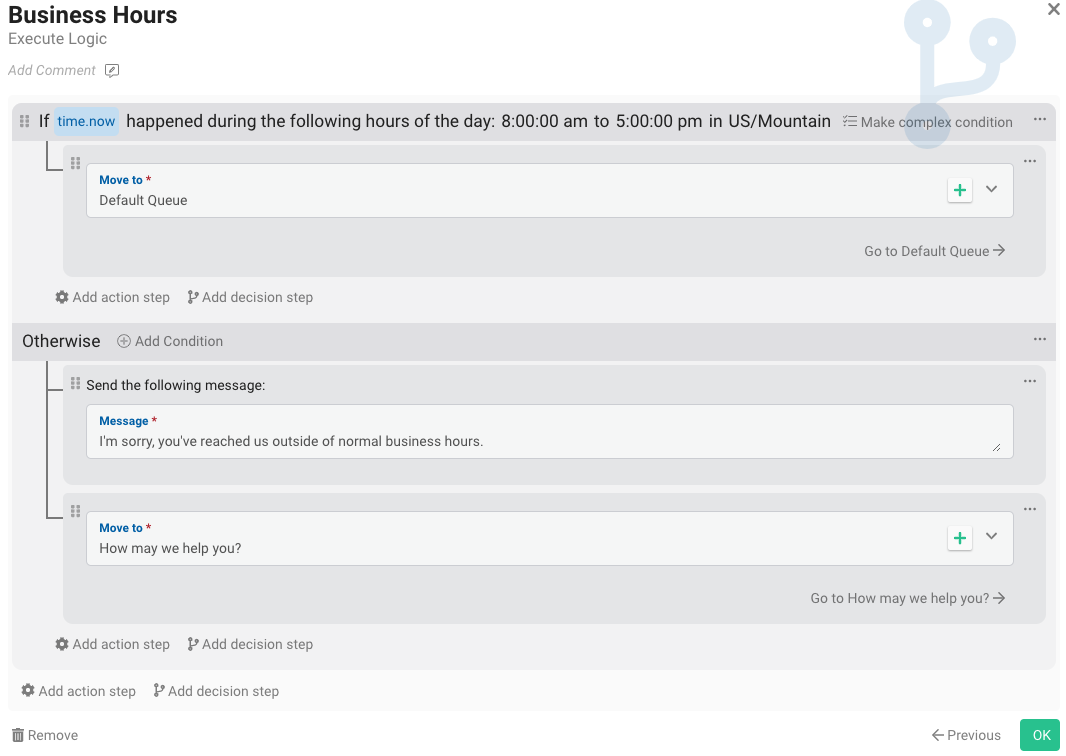 An Execute Logic behavior that goes to different locations based on time of day
In general, if you find yourself repeating non-trivial logic at multiple locations in the bot, you may benefit from adding an Execute Logic behavior to encapsulate and reuse that complexity.
Route
The route behavior encapsulates the various ways your bot can get rid of a conversation without closing it. Route and Close are the two “terminal” bot behaviors - when a conversation reaches one of these behaviors, it will no longer be owned by the bot.

As the screenshot implies, Route behaviors support three possible modes:
Re-Queue Mode
This mode sends the conversation to another queue where it will be handled by other agents. The only necessary configuration is to choose the Target Queue. This is the mode that is typically used by a bot to escalate to a group of live agents in another queue.
Return to Sender Mode
This mode returns the conversation back to wherever it came from. If the conversation was transferred directly to the bot from another user, then it will transfer the conversation back to that same user. If the conversation came to the bot through a queue, this mode will send the conversation back to the queue it was in prior to the bot’s queue, or the Default queue if no such queue exists. This mode has no additional configurations. This is the mode to use when designing a bot that acts as an assistant to live agents in the middle of conversations.
Transfer Mode
This mode transfers the conversation directly to another bot. It requires two additional configurations: Target User - the bot user to transfer the conversation to and Fallback Queue - the queue to put the conversation in if the bot is offline. Either this mode or Re-Queue mode are suitable ways to achieve cooperation between bots, depending on how your queues and roles are set up.
Other Configurations

All three modes allow you to designate which party is expected to respond next: either the customer or the next agent to own the conversation. In most cases, the Agent is expected to respond next. When configured this way, the conversation will not go inactive or close automatically and when it becomes assigned to another agent, the agent response timer will be active. If the Customer is expected to respond next, then the conversation may automatically go inactive and close before receiving a response from another agent, and if another agent receives the conversation the response timer will not be active.
Route behaviors also allow you to attach side effects for sending messages and setting data fields. These side effects are handy if you’d like to say something like ‘Please wait while I find a live agent that can help you’ no matter how you got to the Route behavior.
Close
The close behavior is simply that: a conversation is closed when it reaches that location. Bot flow may move to a Close behavior when it is presumed that the customer’s question has been answered. If you want to close in some cases but not all you should place an Execute Logic behavior in front of the Close behavior.
Close behaviors can be configured to take effect immediately, or to be delayed. When configured with Immediate Close, the conversation will be closed immediately upon reaching the Close behavior. Customer-scoped data obtained during the session will be propagated to any subsequent conversation, but conversation-scoped data is reset. If the customer returns, the bot will start over at the Assigned behavior.
With the Delayed Close option selected, the conversation will be flagged as Inactive and automatically closed after the configured Close Time elapses. If a customer responds during this time, the current conversation will continue and Conversation-scoped data will be maintained. The delayed close requires a Change location action be configured to determine how the conversation should be handled if the customer responds. For example, you may want to send the conversation back to the Determine Intent behavior, or route them to an agent. You can add additional actions, or configure different actions based on conditions in a decision, by switching to Advanced Mode.
Conversations could be automatically closed by the system, just like how it works for live agents. When a customer is unresponsive when prompted for Intent, or when asked a question in a Send a Message behavior that waits for a response, the conversation will eventually close automatically if no additional messages from the customer are received.. If they do respond, they will continue on in the bot flow until they reach a Close or Routing behavior.
Call Webhook
The call webhook behavior allows you to integrate your Quiq bot with an external system outside of Quiq. The call webhook behavior will make an HTTPS request to a REST-style API webhook receiver that you or your development team builds and hosts as a web service. Oftentimes the webhook receiver can be hosted within your current CRM system such as Oracle Service Cloud or Salesforce.
The webhook receiver that you or your developers build follows a contract. Quiq calls out to the webhook receiver with all of the conversation and bot data avialable. Then, the webhook receiver’s response to Quiq contains which actions the Quiq bot should take next. The webhook receiver can send messages and/or set/increment Quiq fields.
Examples of the webhook receiver code can be found at https://github.com/Quiq/botwebhook-examples .
The full documentation of the API contract can be found here: https://developers.goquiq.com/api/docs#tag/Bot-Webhook
Within the Quiq bot designer the call webhook behavior should be configured with a Target URL that points to your webhook receiver webservice. The webhook receiver must also be secured with authentication. Quiq supports two authentication types. Click the “+” symbol in the “Autentication Credential” dropdown to get started.
Basic Authentication - With this credential type your webhook service would be set up to check a basic authentication credential, and return a 401 unauthorized HTTP code in the event that the wrong credentials were provided. In addition, to support platforms that do not allow the standard ‘Authentication’ header such as Oracle Service Cloud customer portal, you can also access basic authentication credentials in the X-QUIQ-AUTHORIZATION header. You can read more about Basic Authentication here: https://en.wikipedia.org/wiki/Basic_access_authentication .
AWS API Key - If you are building your webhook receiver on the AWS platform this would be the prefered option. In this mode Quiq will properly set the AWS API Key headers to ensure that only Quiq has access to the webhook receiver. You can read more about AWS API Keys here: https://docs.aws.amazon.com/apigateway/latest/developerguide/api-gateway-setup-api-key-with-console.html .
Once your webhook is secure, it’s time to think about worst case scenarios. What happens if the webhook has a temporary outage and goes down? Quiq allows you to configure landing spots in the bot for when the webhook succeeds, as well as when it fails. A typical failure configuration would be to simply respond to the user that there was an unexpected issue and route to your human agent queue. At this point your human agents will determine that something is amiss and report an issue to you, the bot designer.
Special Events
We’ve seen how bots control conversation flow by moving between behavior locations. At any given point in time the bot is in one location from which it will transition to other locations in behavior-specific ways. However, there are some special events that can occur on a conversation regardless of the current location. We call these ‘Special Events’ and they represent important events in the conversation lifecycle that you may want to recognize and handle globally.
Special events can be accessed from the Special Events item on the bot toolbar.
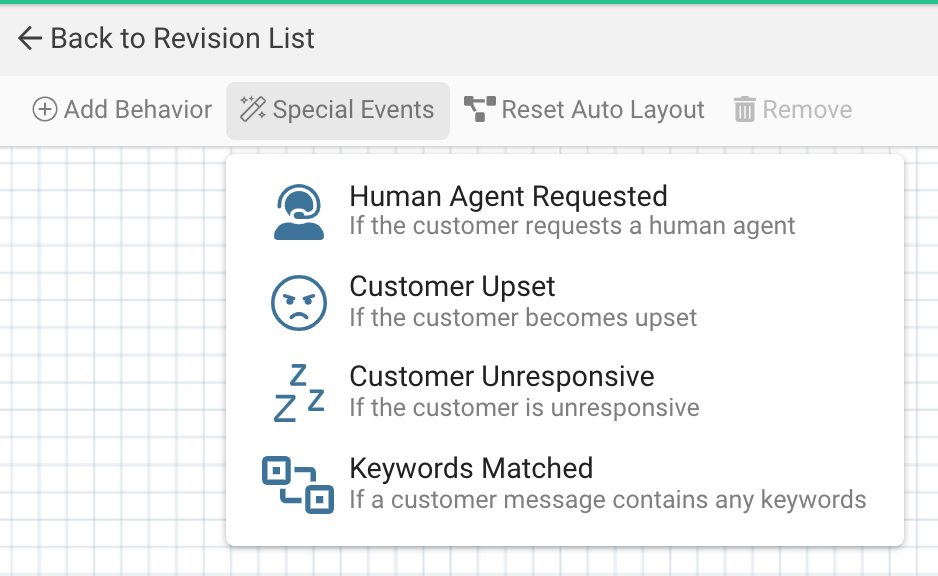
In general, you can react to special events by either changing locations or by sending a message. If you send a message, the bot remains in its previous location. If a special event has been fully configured, it will appear in the flow pane. Double-clicking the special event in the flow pane will open the configuration for that event in the configuration pane.
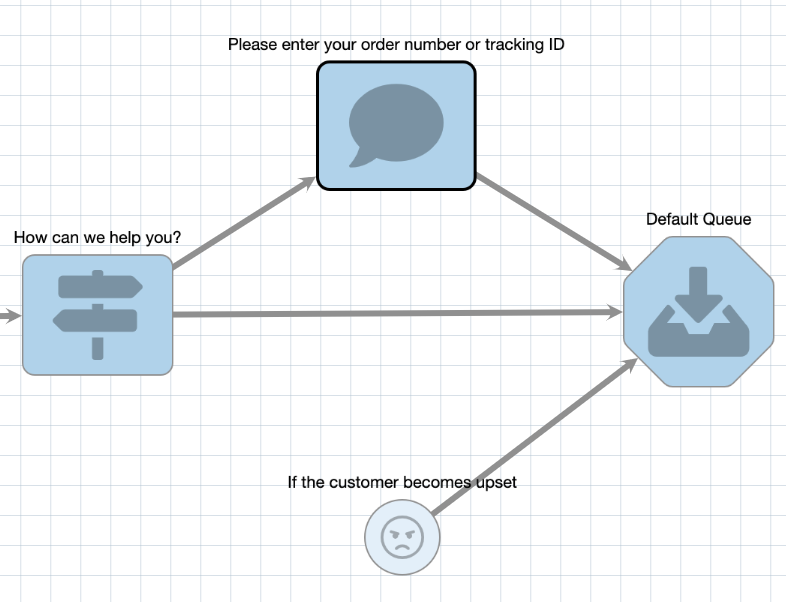 Customer upset handler configured to change location to the Default Queue behavior
Customer Unresponsive
The customer unresponsive event fires whenever the customer has failed to respond for a period of time and may be ignoring the conversation. This event will fire according to the value of the Inactive Timer configuration for the contact point on which the conversation is occurring. This event is analogous to when a conversation is automatically moved from the active to inactive list in a live agent’s Quiq window.
Bot authors may wish to react to this event by sending a follow-up message or escalating to a live agent queue. Sending a message resets the inactive timer, meaning the event may fire again if the customer is still unresponsive. Bots will fire this event no more than 3 times while the conversation is assigned to the bot.
Customer Upset
The customer upset event occurs whenever sentiment analysis detects angry customer sentiment. Bot authors typically react to this event by automatically escalating the conversation to live agents, which is achieved by adding a Change Location action. This event will fire at most once while the conversation is assigned to the bot, and fires at the time the customer sentiment becomes angry. It will not continue to fire while the customer remains angry.
The customer upset event will only fire on English conversations.
Human Agent Requested
The human agent requested event fires whenever the customer sends a message with the intent of gaining access to a live agent/representative. You define the intent in a manner similar to how intents are defined within an intent behavior: you provide example customer messages and keywords that you want to match this intent. Quiq replies aren’t a part of the Human Agent Requested intent definition because this intent is always running in the background.
Keywords Matched
The keywords matched event fires whenever the customer sends a message with the defined keywords. This event is similar to the Human Agent Requested event. For example, the event may be defined with a Change Location action to the main intent behavior if the customer sends a message containing the keyword “main menu”.
Considering Location when Handling a Special Event
You may want to conditionally react to special events. This is easily achieved by adding decisions steps (see Making Decisions). However, there’s a special field on which you can make a decision that’s very useful when reacting to special events, and that is the bot’s current location:
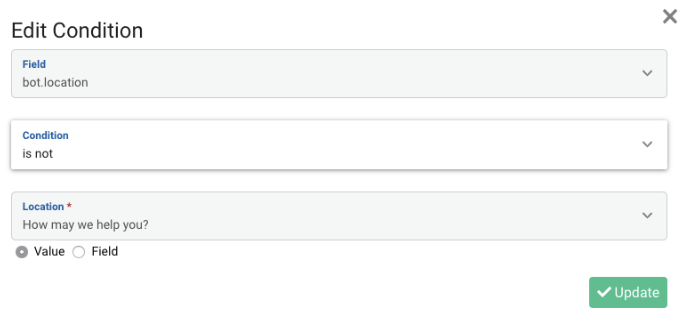
By making a decision on the bot.location field, you can choose different reactions based on the conversations current location in the bot’s flow.
Additional Actions and Side Effects
In addition to sending messages and changing locations, your bot has other abilities that can be leveraged throughout the designer by adding additional actions or side effects.
Set a Field
The bots you design can be configured to fill out data fields on the customer or conversation record. This is analogous to a live agent filling out fields that appear in the right-hand side of the Quiq application (when using Quiq as a standalone product) or filling out fields in an integrated CRM. Bots can do this by adding action steps that Set a data field.
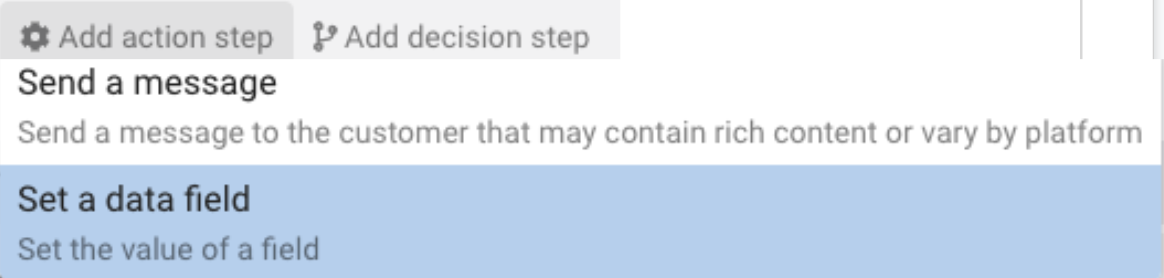
Upon choosing this action, you must then choose the field that you would like to set and provide a corresponding value:

You may wonder why your bot would ever need this action when it could use a Gather Data behavior. You should use the Gather Data behavior for scenarios where you’re directly gathering data from the customer. However, sometimes useful data isn’t explicitly or directly gathered from the customer. For example, perhaps you want to set a ‘disposition’ field to ‘closed-after-hours’ on any conversation that the bot automatically closed because it was after business hours. Or perhaps your bot guides customers through a decision tree but only certain paths merit updating data fields on the conversation. For cases like these, the Set a data field action comes in handy.
Add to a Numeric Field
Your bots can also be configured to add to numeric fields. Simply choose the ‘Add to a numeric field’ action and specify the amount and which field it should be added to.
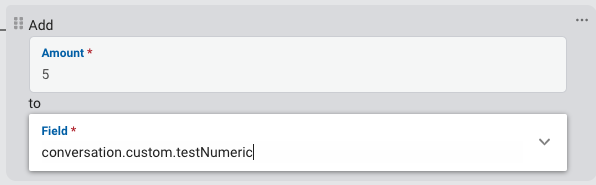
In this case, testNumeric’s value will be increased by 5. Subtraction can be achieved by specifying a negative amount. This action is useful when you want your bot to maintain some sort of running total or score. For example, you might maintain a score based on the customer’s responses to various questions and ultimately use the score to decide how to route the conversation.
If you don’t see any available fields to add to then you need to request that a numeric custom field be added to your site. Please send your request to support@goquiq.com.
Synchronizing Data to External Sources
The data that is gathered, set or maintained by your bots is available to be synchronized into your CRM system or exposed via Quiq’s webhooks and other BI integrations because it is attached to the conversation and customer records.
Synchronizing data into CRM fields doesn’t happen immediately. It can be configured to occur when the conversation starts, changes queue or closes. This behavior is not configured within your bot because it applies to data gathered by live agents as well. For more information contact Quiq Support.
Download Bot Statistics
Statistics can be generated for each Quiq Bot by downloading a CSV file containing data about the flow taken for conversations that the bot interacted with during some time frame or on some version. This data can be further analyzed in a spreadsheet or other third party application to aggregate metrics and KPIs to help you determine the effectiveness of your bot, and determine patterns of how your customers interact with it.
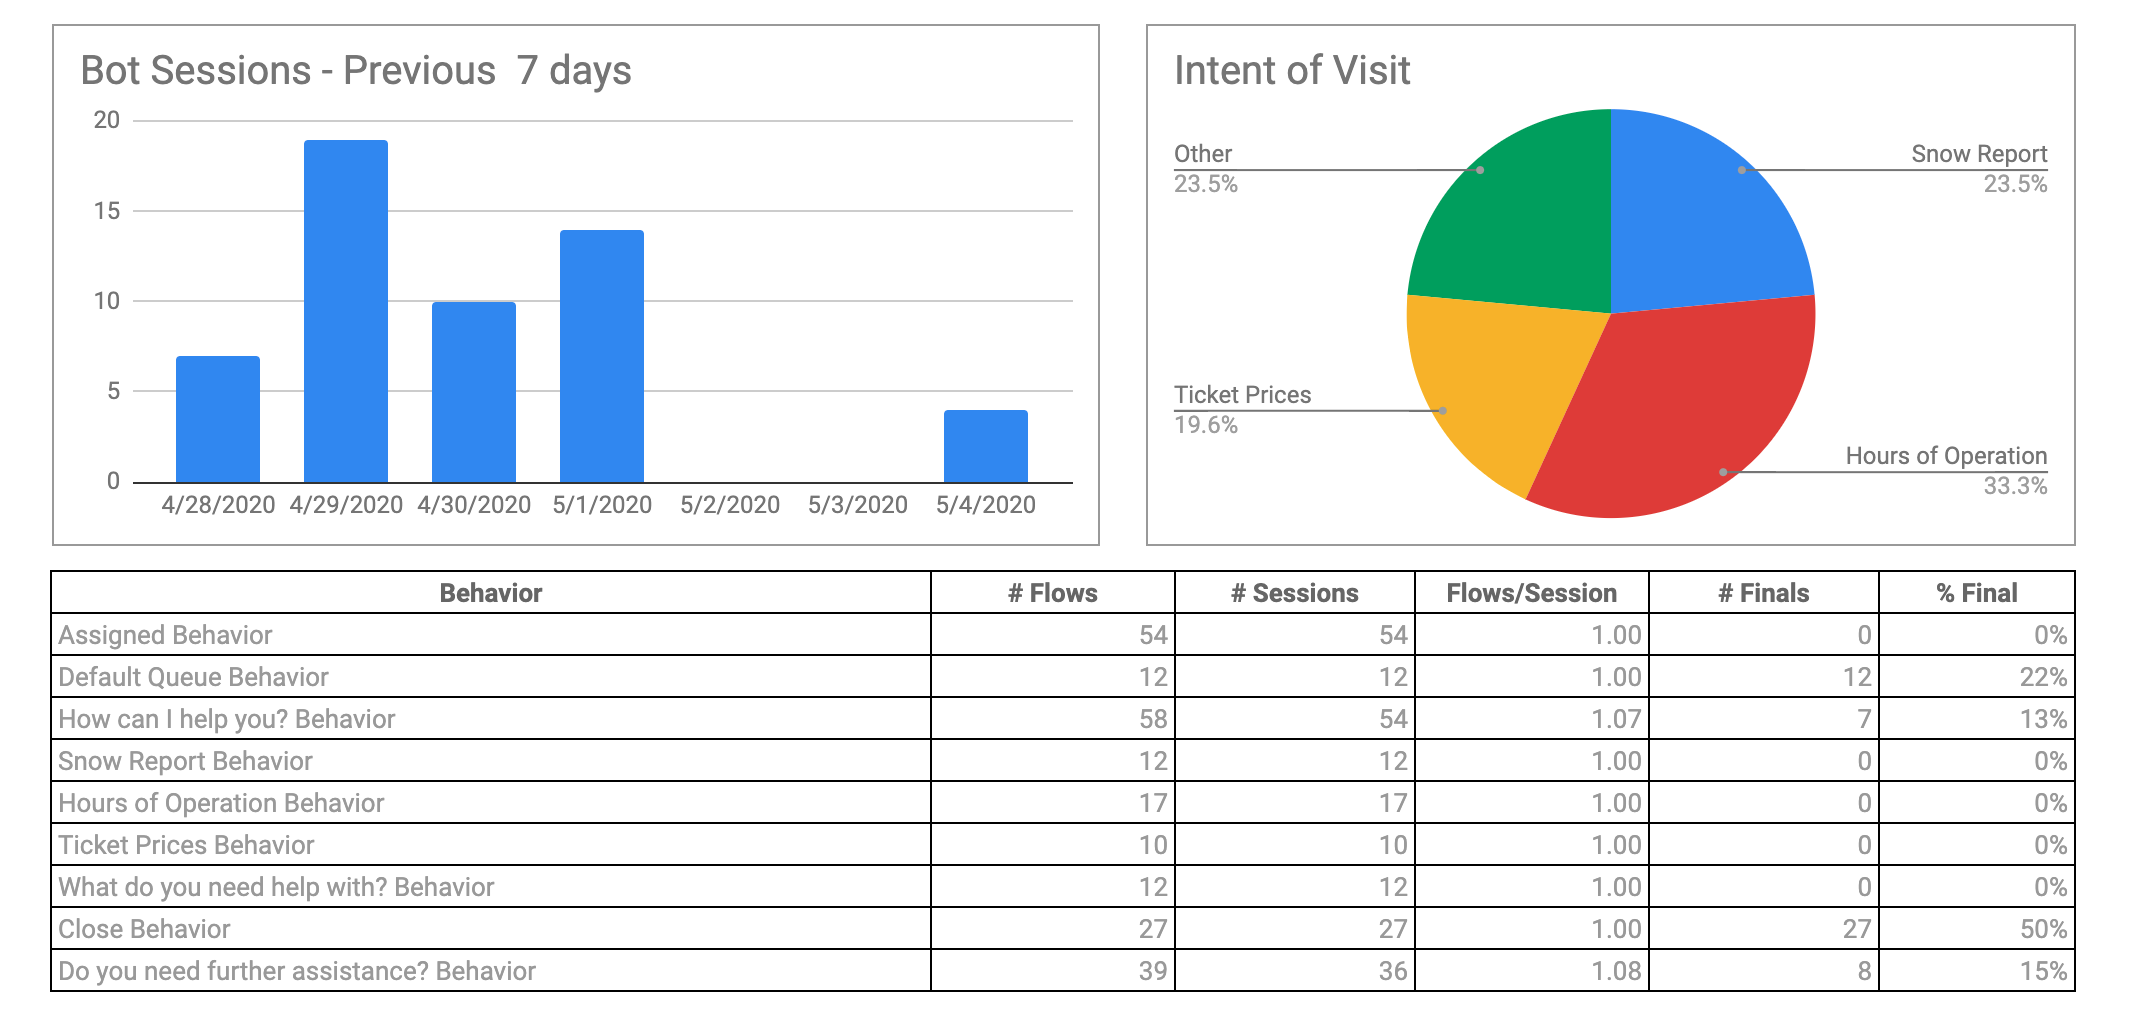
A Download Bot Statistics button is available at the top of the Version History page for each Quiq Bot. When selected, it will prompt for some parameters to choose the information you want to export.

Select Interval will allow you to choose a time frame. All bot sessions that started in that time frame will be returned. Note that only bot sessions that have ended will be returned. You may also filter on some specific version. If you select a specific version, the Time Interval will be automatically set to the time frame the selected version was Live.
You may choose which Behaviors to include as columns in the exported CSV file by setting the Show only the Behaviors in the Live version toggle button. When enabled, only the Behavior locations that exist in the current Live version (i.e. the last published version) will be added as columns. When disabled, any Behavior location that exists in any published version - previous or currently Live - will be included as columns.
When the OK button is selected a CSV file will be generated and downloaded to your local computer. The CSV export will contain a row for every conversation assigned to the bot during the selected time interval. There will be columns of data for:
- General information about the conversation and bot session like the Contact Point, Platform, Customer Handle of the conversation, and the start and end times of the bot session.
- The Final Behavior for the sessions indicating where the customer was in the bot flow when the conversation was closed or reassigned from the bot.
- Each Behavior location, listing the number of times that location was entered during the flow of each bot session
- Each Conversation custom field, listing the value of the field at the time the bot session ended
Bot Designer vs. Conversation Rules
Quiq provides two important features that allow for workflow and conversational automation: the bot designer and conversation rules. The boundaries between these features are not perfect. Some tasks you wish to perform can be accomplished in multiple ways. In this section we’ll characterize the intended use of each feature and provide some best practices.
- Bot designer: The bot designer is intended to automate all or a portion of the messages on a conversation. Put another way, the bot is intended to automate messages within a conversation. The bot is the owner of the conversation in the same way a live agent would be
- Conversation rules: Conversation rules are primarily concerned with automating conversations that don’t have an owner. The automation performed by conversation rules can be generally thought of as automations that happen on a conversation rather than within them.
Based on these bread-and-butter use cases, the following is a list of things we recommend that you not do:
- Don’t try to automate all or a portion of the messages on a conversation with conversation rules. Use a bot for this. Messages sent from within conversation rules are “system messages” - messages that are sent anonymously by the system, perhaps to tell the customer that they are stuck waiting in the queue. The messages you send from conversation rules generally shouldn’t be assessing or addressing the conversational need, just informing the user of things “outside” of the conversation
- Don’t try to design a bot that acts as the “wait queue” for your conversations. Use conversation rules to deal with waiting/unassigned conversations. The bot designer doesn’t have what you need to do a good job of this. Only conversation rules provide an ability to periodically check in on a unassigned/waiting conversation and apply workflow.
A noted gray area between conversation rules and bots has to do with automatically setting or changing the queue, either when the conversation starts or after some important data has been collected. In many cases you can use either feature set to make routing decisions on a convo. In fact, you can design bots that don’t send any messages but only make routing decisions. But remember, in order to have a bot perform routing automation you must first route the conversation to the bot - a task controlled by conversation rules.
Bot Designer vs. Custom Bots
Using the bot designer instead of writing a custom bot is preferable whenever possible for the obvious reason that it’s quicker and doesn’t require any infrastructure. However, there are times when it is necessary to write a custom bot. The following is a list of important limitations of the bot designer.
Designer bots have limited capabilities with regards to interpolating variables, such as the customer’s name, into messages Designer bots are unable to consult data from third-party systems when making decisions or constructing message content
If your bot has these requirements, you should use the Bot API to build a custom bot. Quiq is working to address these limitations and will continue to increase the number of use cases supported by the bot designer.
Training Videos
Video 1 - Quiq Bot Designer Training - Bot Creation Overview (10min)
Video 2 - Quiq Bot Designer Training - Assigned & Bot Behavior Determine Intent (18min)
Video 3 - Quiq Bot Designer Training - Bot Behaviors Gather Data & Send Message (12min)
Video 4 - Quiq Bot Designer Training - Execute Logic - Route - Close (15min)
Video 5 - Quiq Bot Designer Training - Special Events (6min)
Video 6 - Quiq Bot Designer Training - Putting it All Together (27min)
Templates and Examples
To use a template simply click one of the links below to download a bot import file. Then navigate to the Version History page of a bot user you’ve already created and click the Import button at the top of the version history and upload the file. The bot definition will then be imported into that bot’s draft space where you can review and publish the bot.
Tip: If you’d like to play with a bot without configuring the necessary contact points, queues and roles, simply create a bot user and set its status to Available. Then import the bot definition as described above. At that point, you can transfer conversations assigned to you directly to the bot to see how it behaves.
Mountain Bot
This simple example recreates the deflection/escalation bot described in our Bot Developer Guide without writing any code!